
Kicks and banks · 5 min read
Three Rail Kicks When the Cue Ball Starts Near a Rail
A cue ball close to a cushion changes more than the diamond calculation. The rail can shorten the bridge, raise the cue, crowd the grip and tempt you to add unplanned spin. This progression keeps the destination fixed while three starting positions reveal whether the problem is bridge access, route calibration or speed.
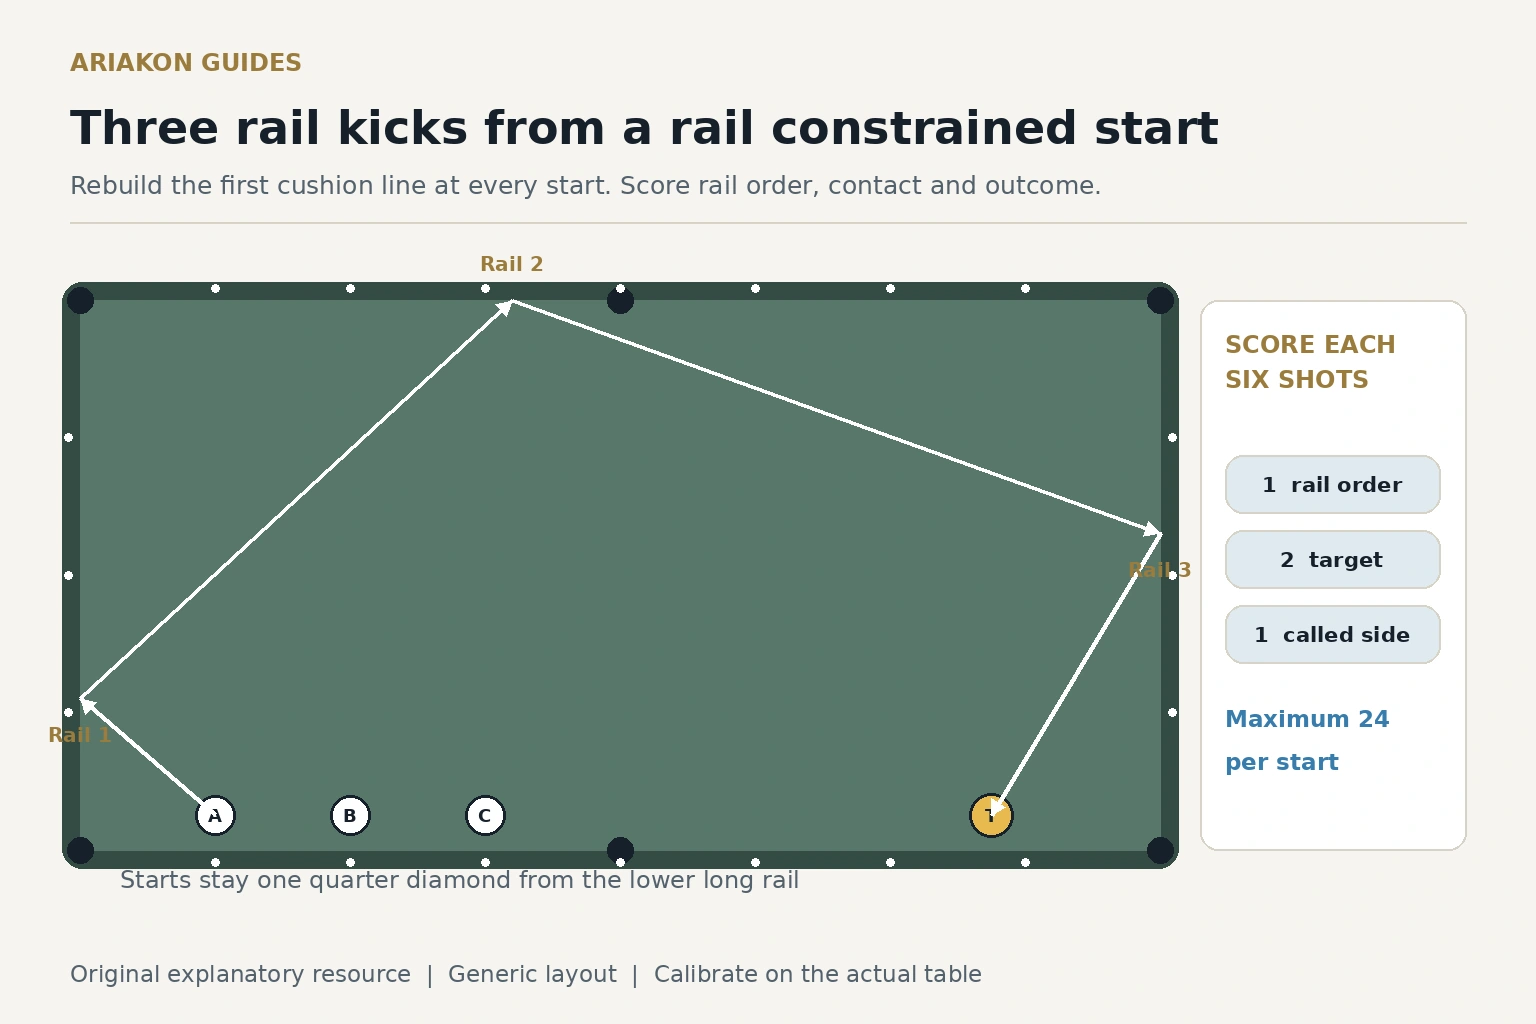
Separate the near rail problem from the general system
The broad three rail guide explains Corner Five references, speed, spin and table calibration. This guide begins after you have one usable three cushion benchmark. Its specific task is to preserve that delivery when the cue ball sits only a small distance from a rail.
Do not force the cue level through a cushion. Use a stable rail bridge and the least elevation the shot permits. If the cue butt or grip hand is trapped, choose a different route or use an allowed mechanical bridge. The route is not worth a fouled ball, scraped cue or unstable stroke.
Calibrate a general three rail system before adding the rail constrained start.
Build a stable rail bridge if the cushion is controlling the cue angle.
Build the labelled baseline layout
Use the diagram coordinate grid with eight diamonds from the head rail to the foot rail and four across the table. Put the target ball one quarter diamond from the lower long rail at length coordinate six and three quarters. Put start A one quarter diamond from the same long rail at length coordinate one.
The planned route contacts the head short rail first, the upper long rail second and the foot short rail third before approaching the target. Use a ghost ball size contact zone on the legal side of the target as the destination. The drawn path is a starting picture only. Calibrate the first cushion aim, running spin and speed on the actual table.
Create a bridge checklist before shooting
- Confirm which hand or rail bridge supports the shaft without sliding.
- Keep the cue clear of the cushion facing and metal or plastic pocket trim.
- Check that the grip hand can complete the stroke without striking the rail.
- Use one documented tip offset and one medium speed intention for the baseline.
- Rebuild the stance if the rail moves the head away from the chosen sight line.
- Stop if the cue ball is touched during address or the bridge cannot remain stable.
Score three starting positions
Shoot six attempts from start A at length coordinate one. Move to start B at coordinate two, still one quarter diamond from the rail, and shoot six. Finish with start C at coordinate three. Reconstruct the system line and first cushion aim for each start rather than reusing the A aim point.
Give one point for touching all three intended cushions in order, two for contacting the target ball legally; use the empty ghost-center window only during separately logged route-only calibration, and one for leaving the cue ball on the called side of the target at a speed that would not obviously sell out an open shot. Maximum is twenty four per start. The final point is a practice judgment; define the called side before every attempt.
| Start | Coordinate | Three cushion routes out of 6 | Target contacts out of 6 | Called side finishes out of 6 | Score out of 24 | Bridge note |
|---|---|---|---|---|---|---|
| A | Length 1, width 0.25 | Fill in | Fill in | Fill in | Fill in | Fill in |
| B | Length 2, width 0.25 | Fill in | Fill in | Fill in | Fill in | Fill in |
| C | Length 3, width 0.25 | Fill in | Fill in | Fill in | Fill in | Fill in |
Use an error map that names the failed rail
Record the first place the route differs from the plan. First rail error usually points to aim, bridge or delivery. A correct first rail followed by a wrong second rail can expose speed, spin or cushion response. A route that reaches the third rail consistently but misses the target is ready for a small table specific correction.
Do not write simply missed. Use first rail short, first rail long, second rail short, third rail long, target thin or target full. That language makes the next attempt smaller and prevents a final miss from hiding an earlier path error.
| First visible error | Check | Next action |
|---|---|---|
| First rail aim varies | Rail bridge and cue line | Shorten the session and rebuild the start |
| First rail repeats, second rail varies | Speed and running spin | Restore one benchmark delivery |
| Third rail repeats, target miss is consistent | Table specific final line | Make one small first cushion correction |
| Target contact repeats, speed is poor | Outcome selection | Keep geometry and adjust speed in a separate block |
Use Corner Five references as a calibrated baseline
The Corner Five family is an existing numerical aiming reference, not an Ariakon invention. Before using a particular version, obtain its actual numbering, origin convention and first-rail relationship. Record the track your own table sends toward the intended third-rail destination; do not relabel a published system or assume one benchmark fits every table.
Near rail positions can make the theoretical cue line physically awkward. If your bridge changes the elevation or contact, create a separate near rail benchmark rather than copying a standing open table correction. Record table, ball cleanliness, cloth condition, speed and intended spin with the result.
Transfer only the stable start to a rack
Choose the start with the highest repeatable target contact rate on two days. Add one blocker that makes the three rail route necessary and remove the practice target zone. Call a legal contact and the safe side of the object ball. Shoot five attempts with the exact bridge and delivery notes from that start.
If bridge access changes in the game layout, the practice result no longer transfers directly. Recalculate or choose another route. The purpose of the progression is to recognize a supported near rail solution, not to force a three rail kick whenever the cue ball is close to a cushion.
Plan a defensive kick outcome once the rail order and target contact repeat.