
Shaft compatibility · 4 min read
Identify Your Pool Cue Joint Before Buying a Replacement Shaft
Identify the complete joint before choosing a replacement shaft. Nominal pin diameter and pitch are useful labels, but a collar, pilot, thread form or internal depth can still differ. The deliverable here is an eight-field packet that a maker or qualified technician can use to confirm the exact pair—not a photo-based fit verdict.
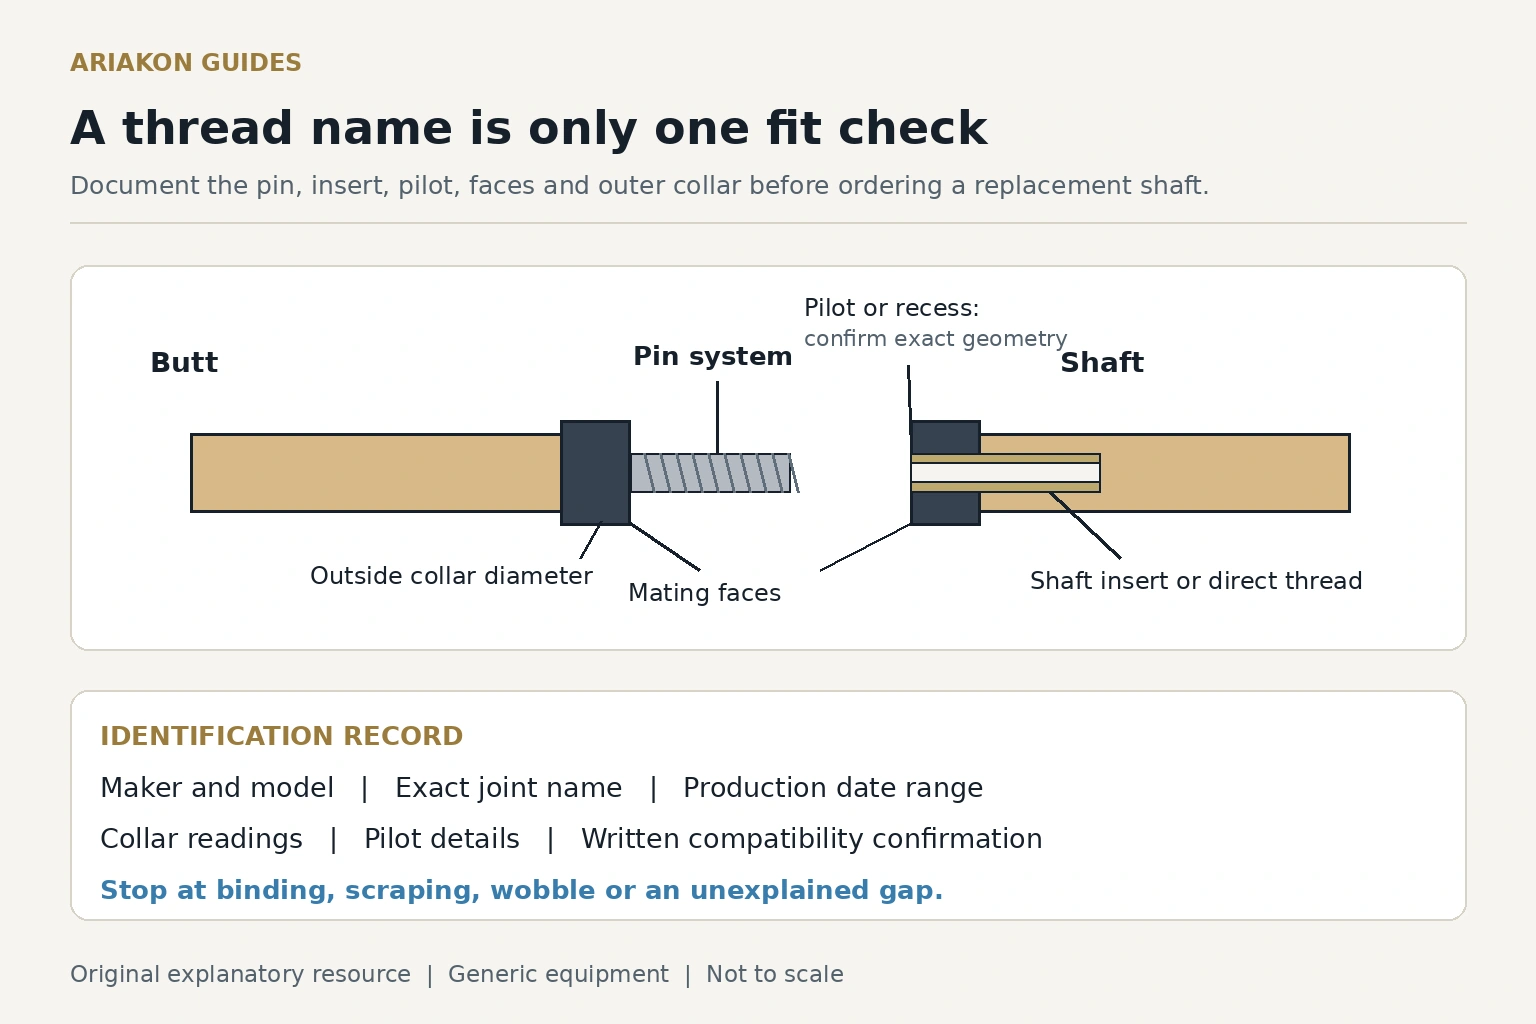
Preserve identity before measuring
Photograph the whole cue, readable model markings, normal detached butt end and normal detached shaft end over a clean padded surface. Save the original order or service record and note any later shaft or joint work. Do not detach glued components, probe hidden material or try unrelated shafts as measuring tools.
A marking can identify a model while leaving a replacement’s actual joint unresolved. If the original parts are not known to be paired, label that uncertainty. Do not infer thread geometry from a visible collar material, an internet photograph or a decorative pattern.
Document an unknown cue first when model and original assembly are uncertain.
Name the cue components so the packet distinguishes butt, shaft, pin and receiving insert.
Complete eight independent fields
Mark each field DOCUMENTED, OBSERVED or UNKNOWN. A photograph can document an observation without proving an internal specification. All required fit fields must be resolved; do not average unknowns into an approval. Keep uncertain model names in the private service packet rather than presenting them as established product facts.
| Field | Write or attach | Unresolved condition |
|---|---|---|
| Cue identity | Exact model/version and dated record | Marking alone cannot prove current fitted parts |
| Replacement identity | Exact shaft and configuration | A product family is not an exact option |
| Thread designation | Diameter, pitch, form and starts as documented | Nominal size alone is incomplete |
| Pin and receiver condition | Clear photos; damage or looseness | Do not force or repair to identify |
| Pilot/recess | Presence, geometry and intended contact | Depth and diameter can differ |
| Mating faces | Intended seating surfaces and permitted assembly | A face gap needs explanation |
| Collar and size | Outer diameter, length and other stated limits | Matching outside size is not thread fit |
| Pair confirmation | Dated written compatibility and care directions | Unknown means hold before ordering |
Read a nominal thread label without overclaiming
Hypothetical label 5/16 × 18 describes a nominal diameter of 0.3125 inch and eighteen threads per inch for a conventional single-start designation. Exactly 0.3125×25.4=7.9375 mm. Pitch is 25.4/18≈1.4111 mm. These calculations explain units; they are not measurements of your cue or proof of its thread form.
Count spaces between equivalent crests over a known axial span, not the total visible crests on the exposed pin. Do not confuse turns to seat with threads per inch. For a multi-start thread, lead per turn and adjacent-thread pitch differ; a specialist must establish the full designation. Worn, truncated or nonstandard features cannot be identified safely with a simplified conversion.
Treat collar and pilot checks as separate questions
Two hypothetical collars are documented as 21.20 and 21.40 mm. Their diameter difference is 0.20 mm and, if concentric, the radial step is 0.10 mm. That arithmetic says nothing about thread engagement or whether the step is acceptable for the actual pair. Never sand a collar to turn a mismatch into a fit.
If a pilot and recess are present, ask which surfaces locate and which should remain clear. Use the dedicated interval worksheet rather than assuming any apparent recess accepts the projection. Likewise, wood visible outside a joint does not establish either the mating-face material or the receiving thread.
Calculate documented pilot-clearance intervals only under the actual contact assumptions.
Separate face material from fastening geometry when a construction label is being used as a fit claim.
Work a hold decision and a received-pair check
Hypothetical packet: identity, exact replacement, thread designation, pin condition, faces and collar information are present; pilot geometry and exact pair confirmation remain unknown. Six filled fields and two unknown fields make eight. The decision is hold, not 75% compatible. Send the two precise questions before ordering.
After confirmation, use only the normal matched assembly method. Start gently by hand over a padded area; stop at unusual resistance, a premature hard stop, a visible gap, damaged threads or looseness. Never force, tap, lubricate without permission or alter parts to test compatibility. A seated joint still needs the separate received-shaft inspection.
For Ariakon carbon equipment, the current FAQ specifies a clean soft cloth and avoidance of abrasive cleaners, excessive heat and modifications. Ask support before an unfamiliar care product; this guide invents no universal joint lubricant or solvent recipe.
Inspect the received replacement without substituting seating for an alignment check.
Read Ariakon shaft configuration information and obtain written confirmation for the exact butt before ordering.
Sources and further reading
References support the specific factual information above. The practical checklists are Ariakon editorial guidance.