
Position play · 4 min read
Get on the Correct Side of the Next Pool Ball
The correct side of the next ball is the side that leaves the intended angle for the shot after it. It is not automatically the near side, the center of a position zone or the side that makes the next ball easiest. A landing point can pocket the next ball comfortably yet leave no natural cue-ball route onward. This guide turns that hidden choice into a visible line, a broad zone and a scored three-ball decision.
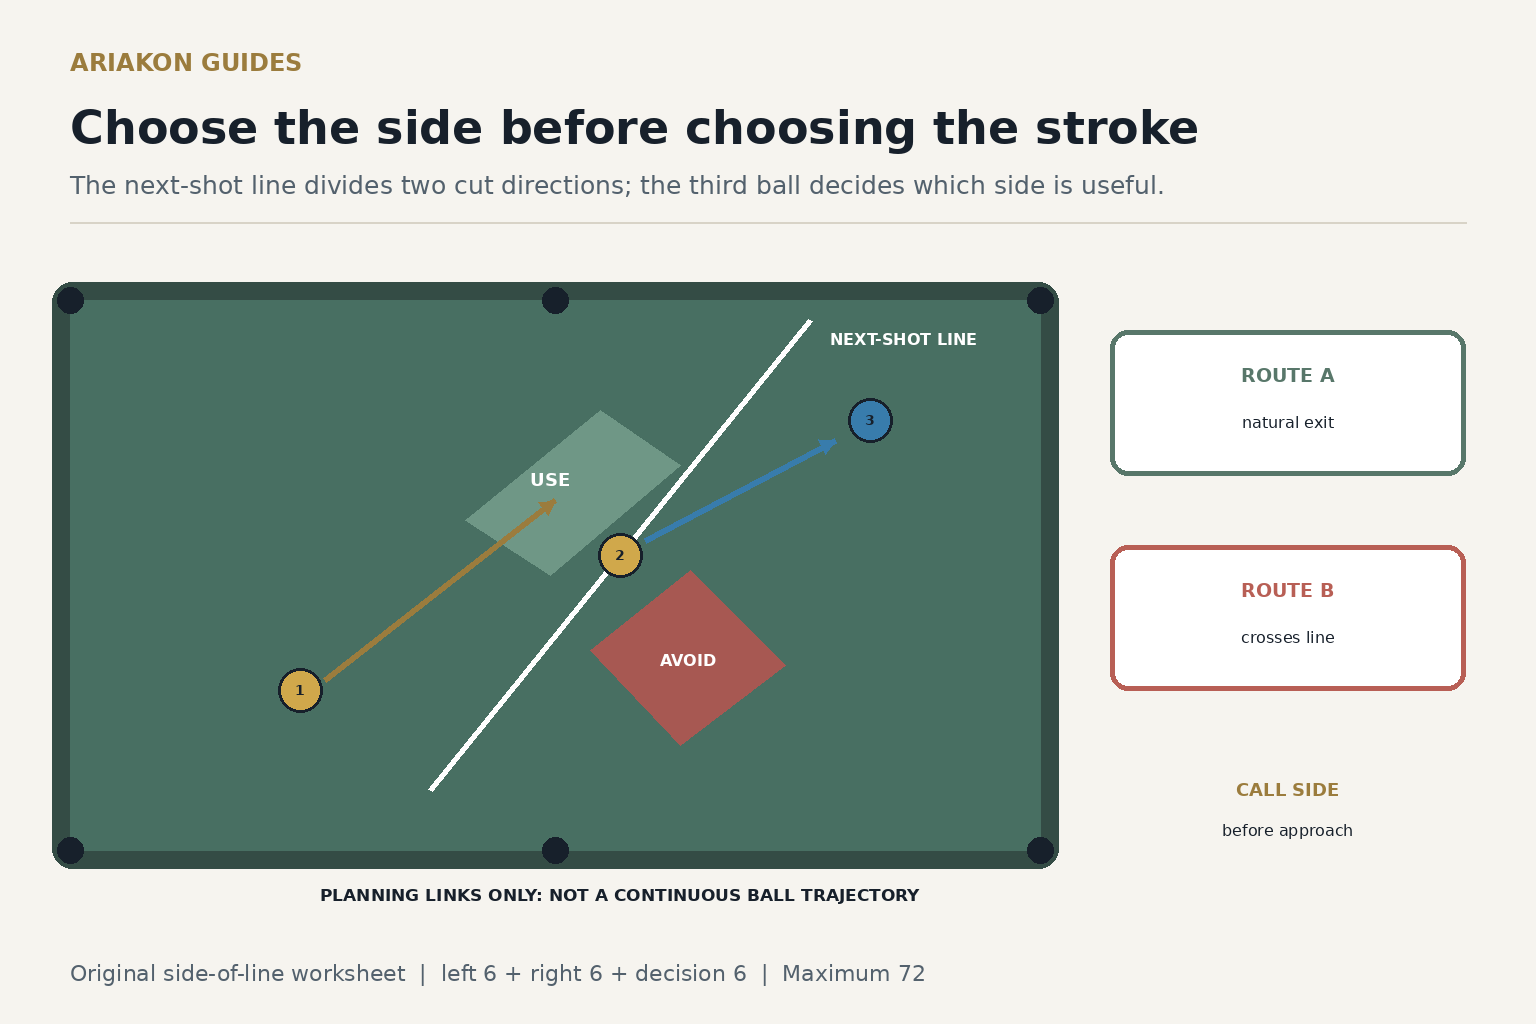
Draw the next-shot line before choosing position
Identify the next object ball, its intended pocket and the center of the ghost-ball contact position. Imagine a straight line running from that pocket through the next object ball and beyond it. That is the next-shot line. The cue ball arriving on one side produces a cut in one direction; crossing the line reverses the cut. Name which cut direction leaves the simplest route to the third ball before selecting how to play the current shot.
The useful side depends on the third ball, traffic, cushion access and speed margin. Mark a broad green landing zone on the preferred side and a red avoid zone on the other. Loose markers must be removed before shooting. Do not aim for the boundary: speed error near the line can turn a useful angle into accidental straightness or the opposite cut.
Preserve useful position angles for the broader principle of keeping natural routes available.
Plan pool patterns backward when more than three balls determine the side choice.
Use a two-route decision worksheet
Complete both columns while standing. A route is not superior because it uses fewer rails or no sidespin; it is superior when its likely range of finishes preserves a playable next shot with less collision and scratch risk. Start with natural roll, stop or stun routes. Add sidespin only when the layout requires it and your table calibration supports the compensation.
| Question | Route A | Route B |
|---|---|---|
| Arrival side | Left of next-shot line | Right of next-shot line |
| Next cut | Object ball cuts right | Object ball cuts left |
| Natural exit | Name rail or open lane | Name rail or open lane |
| Traffic risk | Ball or scratch path | Ball or scratch path |
| Speed margin | Short / acceptable / long | Short / acceptable / long |
| Decision | Use or reject with reason | Use or reject with reason |
Run the eighteen-attempt side-of-line drill
Set three balls in an open L-shaped pattern: Ball 1 about one diamond from a foot corner, Ball 2 near table center and Ball 3 about one diamond from the opposite long rail. Choose pockets so Ball 2 has a visible left-side route and right-side route toward Ball 3. Adjust the layout during unscored calibration until both sides are playable without a forced reach, then mark all centers.
Shoot six attempts to the left zone, six to the right zone and six decision attempts in which you choose the side before entering the stance. Use one current-shot pocket throughout. After every attempt, leave the cue ball where it stops long enough to record center location. Reset the object balls exactly.
| Point | Requirement |
|---|---|
| 1 | Current object ball is pocketed in the called pocket |
| 1 | Cue-ball center finishes on the called side of the next-shot line |
| 1 | Cue ball finishes inside the broad called zone |
| 1 | Next ball has a full legal path and the planned third-ball route remains available |
| Maximum 72 | Eighteen attempts; record line crossings separately |
Worked example: near-perfect position is the wrong side
A player plans Ball 2 to the upper corner and Ball 3 to the opposite side. Route A finishes eight inches from Ball 2 but just across its shot line, leaving the cue ball naturally moving away from Ball 3. Route B finishes fourteen inches away on the other side, leaving a comfortable cut whose rolling path enters the large Ball 3 zone. Route B is correct even though it is farther from Ball 2.
The first eighteen attempts score 57 of 72: pocketing earns sixteen points, called side twelve, landing zone eleven and preserved route eighteen. Five cue balls cross the line after taking too much pace. The next action is not a new aiming system; it is another six-shot block with the same route and a nearer front boundary for the landing zone.
Diagnose the miss by where the cue ball crossed
| Evidence | Likely next check |
|---|---|
| Correct route, long across line | Reduce delivery speed or choose an earlier cushion contact |
| Correct speed, wrong side immediately | Recheck tangent/rolling path and current-shot contact |
| Zone reached, third-ball route blocked | The chosen side or zone is tactically wrong; redraw it |
| Alternating both sides | Stabilize contact and delivery before shrinking the zone |
| Good in drill, poor in racks | Require a standing side call on every three-ball pattern |
Compare tangent and rolling cue-ball routes when the correct side is clear but the route is not.