
Position play · 3 min read
A Two Ball Position Drill for Choosing the Next Shot Angle
Position is useful only if it leaves the next shot with the intended angle. A round target can reward a cue ball that lands on the wrong side of the next object ball. This drill replaces the dot with a three-band wedge—too thin, useful and too full—then mirrors the layout so the player must choose the side before bending over the first shot.
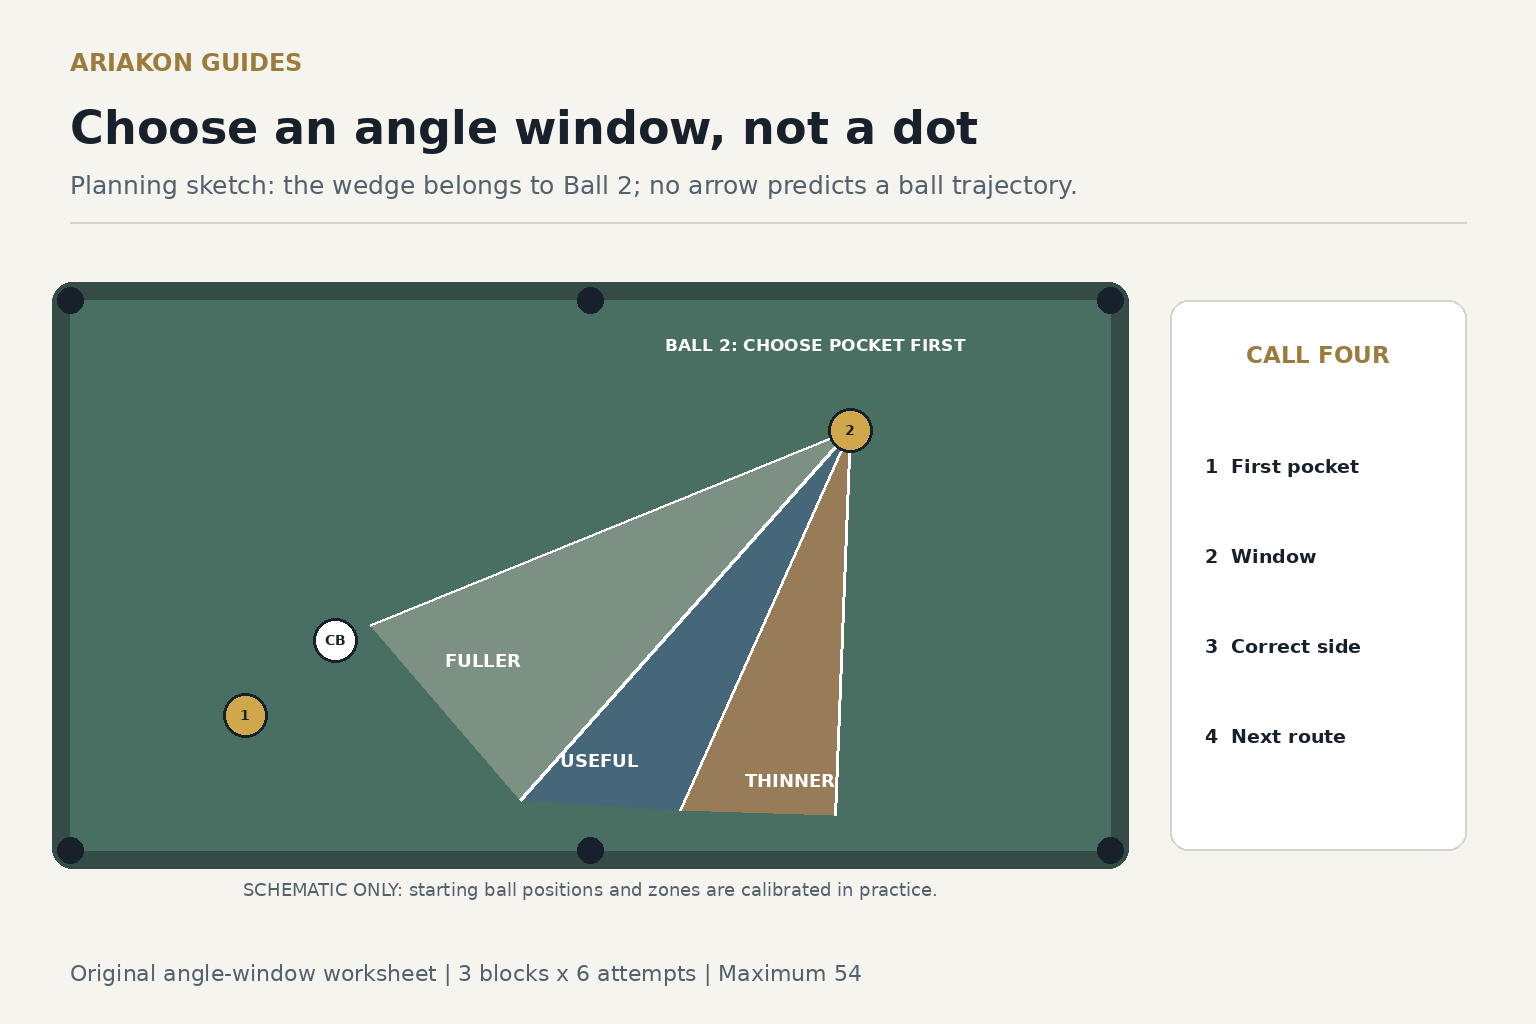
Build the two-ball layout
Place Ball 1 one diamond from the foot rail and one diamond from the left long rail; its pocket is the left foot corner. Place Ball 2 on the table's long centerline, one diamond above the side-pocket line; its pocket is the right head corner. Put the cue ball near table center so Ball 1 is a comfortable cut. Mark a broad landing wedge on the approach to Ball 2.
Draw two boundary lines from Ball 2 toward the cue-ball landing area. The central band should leave a comfortable cut toward the called pocket. The near band is too full and the far band too thin for the intended route. Exact widths belong to the table and player; make all three visible before scoring.
The illustration is a planning sketch only. Its wedge boundaries originate at Ball 2, and its ball symbols do not trace the first collision. Calibrate a legal route during unscored trials and freeze the resulting marks before scoring. In eight-ball practice, use two legal remaining balls of your group; rotation practice must preserve the actual first-ball order.
Choose area, line or point position before deciding that this next shot needs an angle window.
Call the next-shot picture while standing
| Call | What to point at | Why it matters |
|---|---|---|
| Ball 1 to left foot corner | Locks the first task | |
| Window | Central shaded wedge | Defines acceptable position |
| Side | Above or below Ball 2's pocket line | Prevents wrong-side success |
| Next route | Ball 2 to right head corner | Connects position to purpose |
Shoot eighteen attempts in mirrored blocks
| Block | Layout | Attempts | Task |
|---|---|---|---|
| A | Original left-side layout | 6 | Find the broad useful window |
| B | Mirror across long centerline | 6 | Rebuild the picture on the other side |
| C | Alternate original and mirror | 6 | Choose without repetition order |
Score first shot, window and side
| Points | Ball 1 | Cue-ball finish | Next-shot picture |
|---|---|---|---|
| 0 | Miss or foul | Any | Any |
| 1 | Pocketed | Outside every marked wedge band | Any next-shot picture |
| 2 | Pocketed | Inside the marked wedge but outside the useful correct-side band | Wrong side or thin/full band |
| 3 | Pocketed | Central band | Correct side and called pocket remains available |
Diagnose the angle, not just the distance
| Repeated finish | First inspection | Next six attempts |
|---|---|---|
| Too full | Cue-ball traveled too far toward Ball 2's line | Keep aim; reduce route distance |
| Too thin | Cue ball stopped before crossing the useful band | Keep aim; add measured speed |
| Wrong side | Standing plan did not name the side | Point to side before bending |
| Scattered | First-shot pocket line or contact varies | Widen wedge and restore baseline |
Work the score into a game decision
Eighteen attempts have a maximum of 54. A worked log scores 15 of 18 on the original layout, 11 on the mirror and 13 when alternating. Four mirrored finishes are too full. The next block is six mirrored attempts with the same route and a slightly shorter speed call; changing aim and speed together would hide which adjustment mattered.
For transfer, remove the wedge marks and play six full two-ball patterns. Before each first shot, point to the intended side of Ball 2. Score 1 for Ball 1, 1 for the called angle window and 1 for Ball 2; maximum 18.