
Cue buying · 4 min read
Five Measurements to Record Before Buying Your First Pool Cue
A first-cue comparison becomes easier when every candidate is described with the same five measurements. Begin with a safe cue you already use, keep the assembly and units consistent, and record the method beside every number. These readings create a personal baseline; they are not certified product specifications or universal targets.
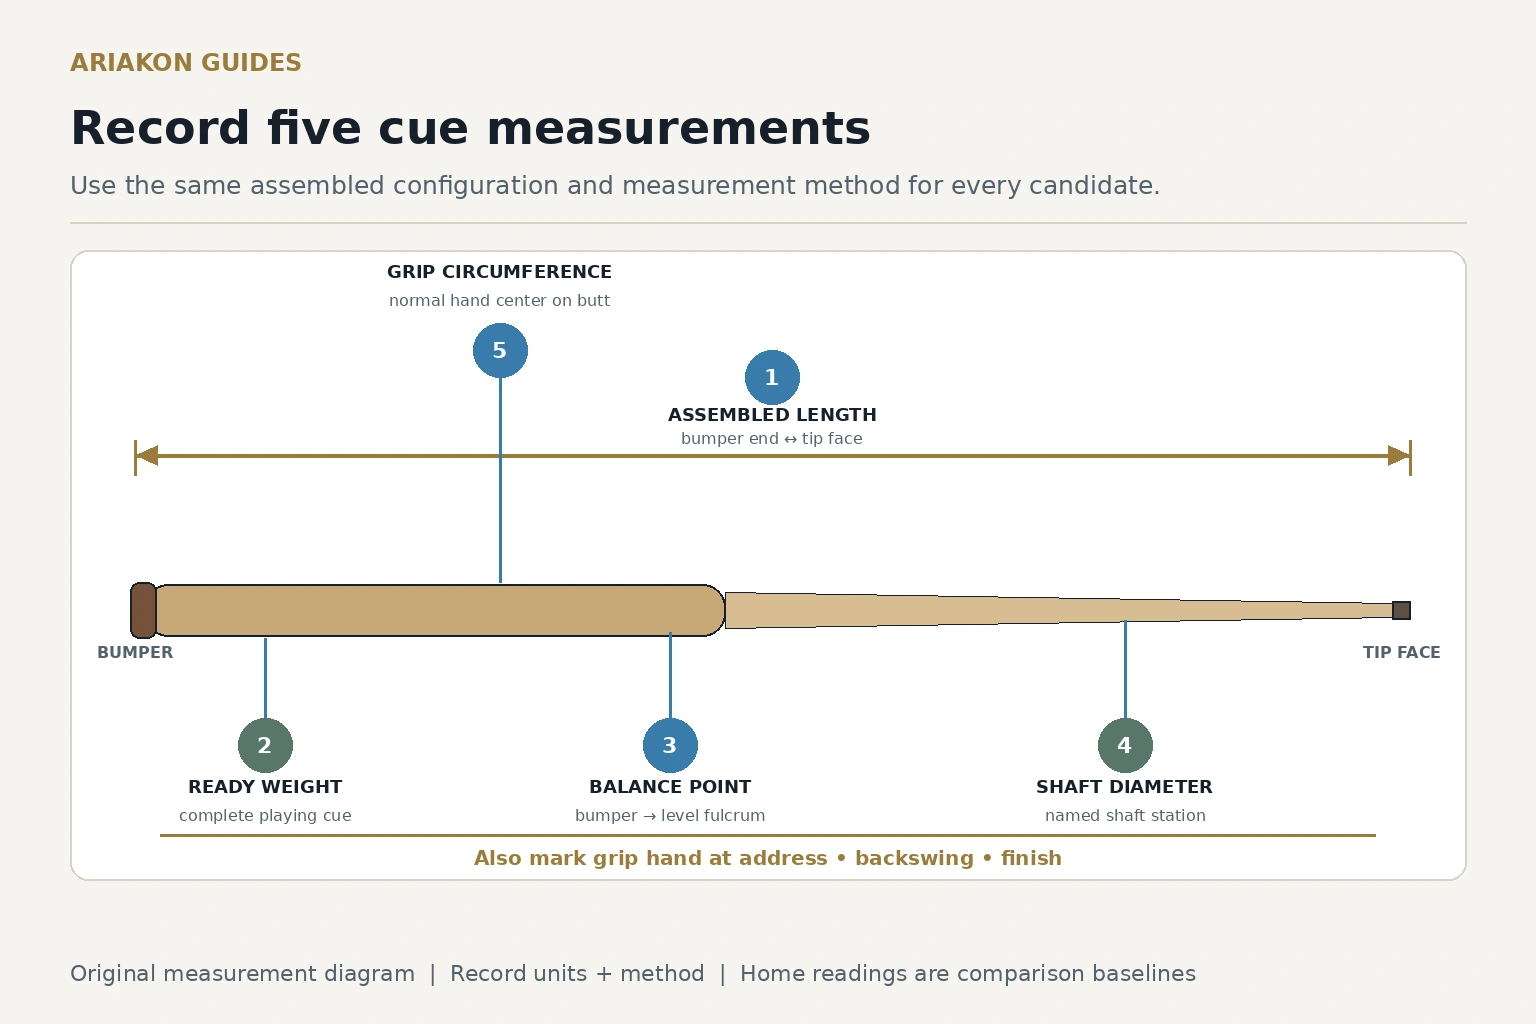
Prepare one repeatable measurement station
Use a clean flat surface, a rigid tape or rule, a suitable scale, a padded narrow fulcrum, removable tape and calipers only if you can close them gently. Inspect the cue first and do not measure a loose, cracked or visibly damaged assembly.
Assemble the normal playing cue with its tip, shaft, butt and bumper. Leave a detachable extension off unless it is part of every normal shot. Record inches or millimeters consistently; NIST explains the SI unit framework and exact inch-to-millimeter relationship.
Record the five measurements
Write the tool resolution and mark home readings approximate when the equipment is not calibrated. More decimal places do not create more accuracy. If two repeated values disagree by more than the tool can explain, inspect the setup rather than averaging away the problem.
| Measurement | Method | Repeatability check | Common error |
|---|---|---|---|
| 1. Assembled length | Tip face to bumper end along cue axis | Repeat after rotating cue 180° | Measuring to a joint or optional extension |
| 2. Ready weight | Complete cue on suitable scale | Lift, zero and weigh three times | Adding separate section weights |
| 3. Balance point | Bumper end to level padded fulcrum | Find point three times; use middle reading | Changing assembly between readings |
| 4. Shaft diameter | At a named station below tip | Two gentle readings after tool reset | Treating tip label as shaft diameter |
| 5. Grip circumference | Flexible tape at normal grip-hand center | Repeat without compressing wrap | Measuring the narrow shaft |
Add a three-mark grip-location trace
Place removable tape at the grip-hand center during address, at the farthest backswing and at the finish. Measure each mark from the bumper. This trace reveals whether the hand remains on a comfortable usable area; overall length alone cannot answer that question.
Pass when the normal movement stays clear of the bumper, wrap edge and any abrupt diameter transition without changing stance. If a longer cue leaves the marks unchanged, the extra length may not solve the actual fit issue.
Run the detailed cue-length fit test when the grip trace or room clearance fails.
Treat ready weight and balance as a pair
Two cues with the same ready weight can feel different when their balance points differ. Keep the shaft, bumper and any normal weight system in the same configuration. Support the cue on the padded fulcrum, find level without pressing it down, and measure from the bumper end.
Then use ten controlled straight stop attempts per safe candidate on an illustrative 8×4 bed: O(6,3), real corner P(8,4), tangent cue center G(5.839003,2.919502), C(4.944576,2.472288), ball radius 0.09. Scale to the actual bed and balls and remove setup aids. Record legal pots and joint pot-plus-stop finishes separately. For this task the six-inch-diameter tolerance is centered at G, where the cue ball collides, rather than at the object’s former center. Record grip effort from 0 to 3 independently; discomfort stops the trial. The result connects fit observations to delivery without proving one balance location best.
Keep rule limits and compatibility separate
The current competition equipment specification gives broad boundaries, including a 40-inch minimum cue length, 25-ounce maximum cue weight and 14-millimeter maximum tip width for covered events. Passing those boundaries does not establish fit. Verify the current rules for your event.
Before buying a replacement shaft, record the exact joint identity from a reliable current source. Thread, pilot and collar compatibility cannot be established from approximate diameter or appearance. Joint identity is a separate compatibility gate, not one of the five fit measurements.
Identify a cue joint before ordering a shaft after the fit measurements are complete.
Use a worked comparison to choose the next test
Suppose the familiar baseline is 58.0 inches, 19.0 ounces, balances 19.0 inches from the bumper, measures 12.75 millimeters at the named shaft station and has a 4.10-inch grip circumference. Candidate A matches length and circumference but balances 1.0 inch farther forward. Candidate B is 1.0 inch longer and moves the farthest backswing mark to the last half-inch of usable handle.
Test A for tempo and grip effort; test B for grip clearance. The worksheet does not pick a winner by arithmetic. It identifies the exact difference that needs a table trial. Save the completed sheet with the current listing or maker document and the receipt.
Use the complete cue selection framework to add purpose, budget, condition and support evidence.
Sources and further reading
References support the specific factual information above. The practical checklists are Ariakon editorial guidance.