
Nine-ball strategy · 3 min read
Nine Ball Pattern Planning From the Three Ball to the Nine
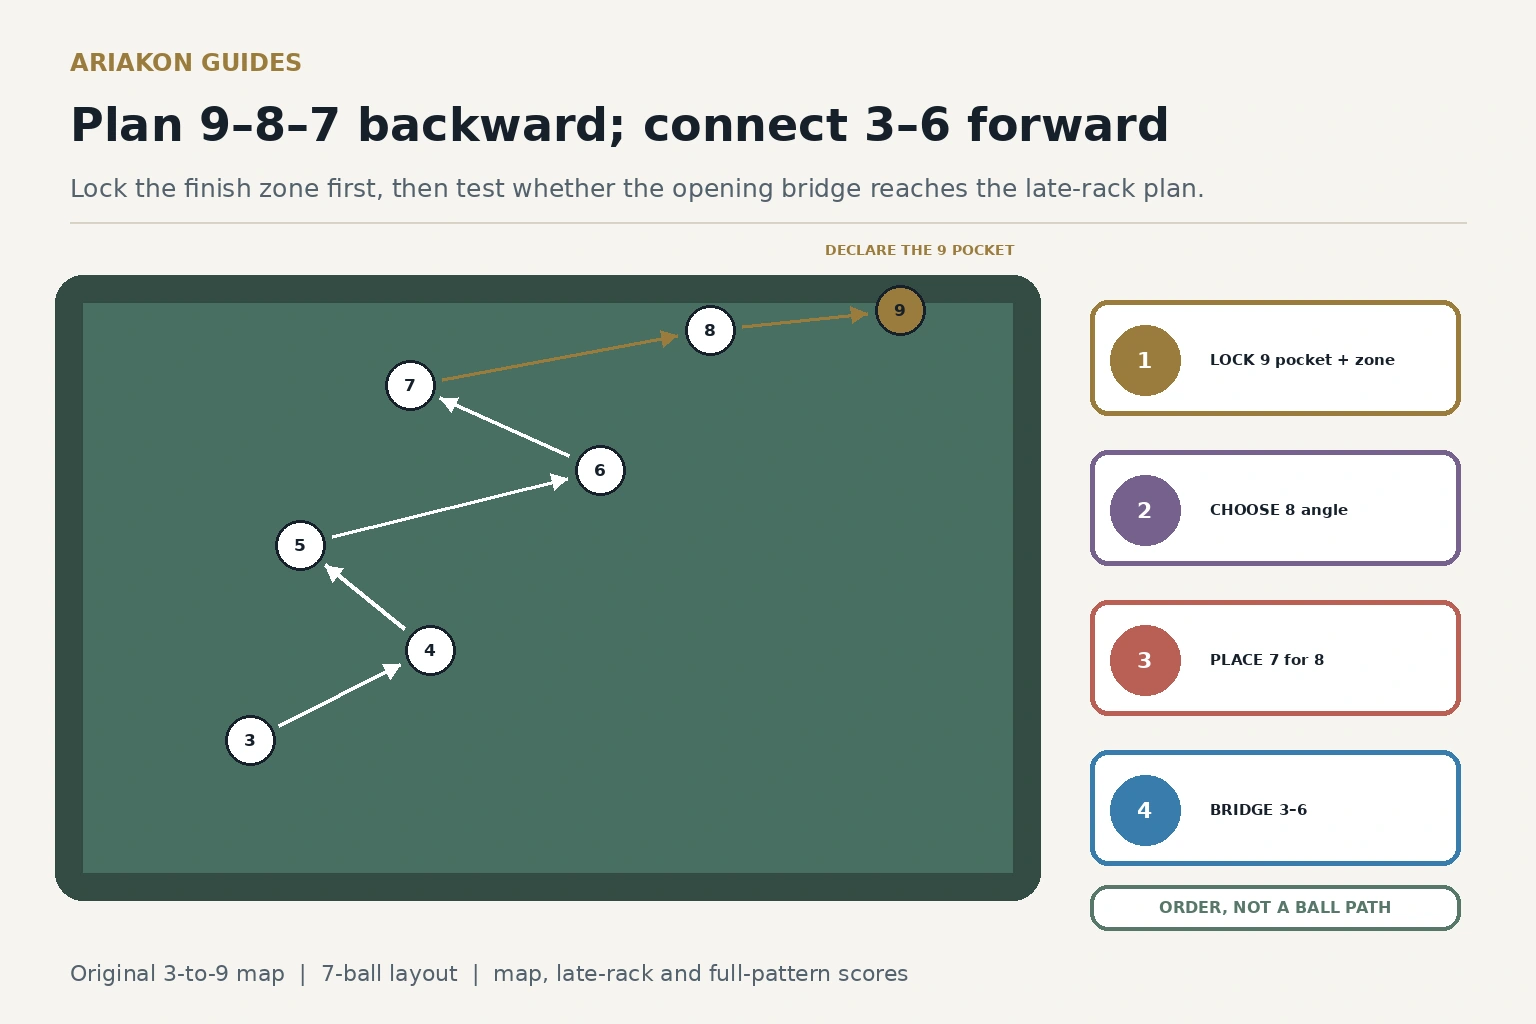
The lowest-number rule fixes the legal first contact, but it does not build the pattern. From the three ball onward, first lock the nine-ball pocket and the side of the eight that feeds it. Add the seven, then connect the three through six. This keeps late-rack decisions from being improvised only after the hard work is already done.
Start with the legal order and the finish
Under the current WPA nine-ball rules, the cue ball must first contact the lowest-numbered ball remaining on ordinary shots. Pocketing in order is not the same as planning: every leave should preserve a legal, controllable next shot. Confirm the active event rules before play.
Use the foot-left corner as (0,0), four diamonds across and eight along the long rail. Mark the 9 at (3,1) for the foot-right corner, 8 at (2,2.5), 7 at (1,3.5), 6 at (3,4.5), 5 at (1,5.5), 4 at (2.5,6.5), 3 at (1,7) and cue ball at (2.5,7.5). Shift a marker by no more than one ball width if a spot interferes, then preserve that version.
Ask three questions before every nine-ball shot for the legal-contact, next-angle and miss check.
Prevent early-rack nine-ball errors for the break-to-three transition.
Lock 9–8–7 backward
Draw a one-diamond landing zone rather than a dot. If the eight requires forced speed or heavy sidespin to reach the nine, reconsider its pocket or the seven-ball zone.
Shoot the 7–8–9 mini-pattern six times with cue ball in hand before the seven. Score one point for each pocket, one for reaching the eight zone and one for reaching the nine zone; maximum thirty.
| Ball | Plan before shooting |
|---|---|
| 9 | Pocket and broad no-scratch cue-ball finish |
| 8 | Pocket and side that sends the cue ball naturally to the 9 |
| 7 | Pocket and landing zone for the useful side of the 8 |
Connect 3–6 as the bridge
Now plan the six-ball leave for the previously chosen seven-ball zone. Work backward through five, four and three, but execute forward. Keep at least one broad side-of-ball target at every transition and name the intended rail count.
Run only 3–4–5–6 six times with ball in hand before the three. Score one for each legal pocket and one for delivering the cue ball into the declared seven-ball zone; maximum thirty. A successful bridge is not yet a full run, but it isolates whether the opening half serves the locked finish.
Score the full seven-ball pattern
A miss ends execution scoring for that reset, but preserve the plan score and write the first broken link. Do not move a later ball to rescue the attempt.
These point values are an original progression, not an official rating. Compare only repeated versions of the same layout.
| Component | Points per reset |
|---|---|
| Plan | 9 pocket, 8 side and 7 zone written: 3 |
| Bridge | 3, 4, 5 and 6 pocketed legally: 4 |
| Finish | 7, 8 and 9 pocketed legally: 3 |
| Zones | Seven-ball, eight-ball and nine-ball zones reached: 3 |
| Control | No foul, scratch or unplanned collision: 1 |
| Maximum 56 | Four resets × fourteen |
Worked example and game transfer
A hypothetical player pockets 7–8–9 five of six times but reaches the seven-ball zone only twice from the 3–6 bridge. Full-pattern attempts fail twice from leaving the six straight. The next action changes the five-ball landing zone to preserve a natural angle on the six; the nine-ball pocket and late-rack plan remain locked.
For game transfer, begin planning when the three becomes the lowest ball in three ordinary racks. Mark only the chosen nine pocket, eight side and first broken link after the rack. If traffic changes the table, replan from the current legal ball rather than forcing the worksheet pattern.
Sources and further reading
References support the specific factual information above. The practical checklists are Ariakon editorial guidance.