
Break shot · 4 min read
Diagnose a Bad Pool Break With Five Observable Outcomes
Diagnosing a break is not the same as selecting a faster effort or buying a cue. Keep five outcome fields apart, inspect the input before every strike, and use the first supported failure to choose one small retest. A made ball is context, not proof of a good delivery.
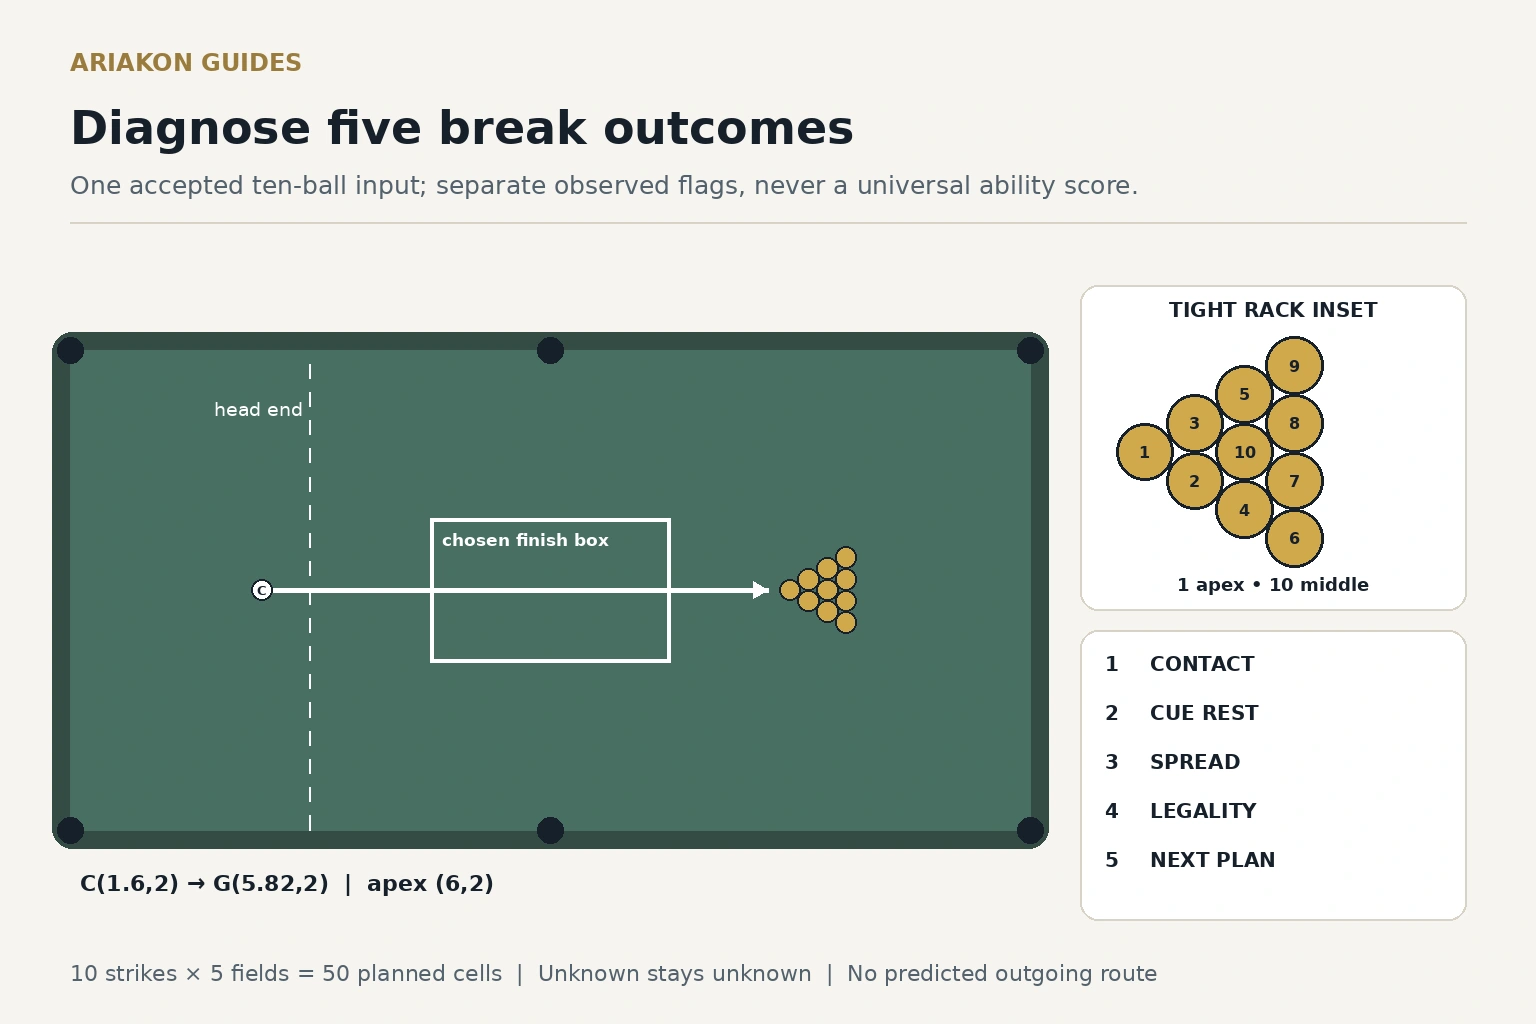
Freeze a rule-compliant input before interpreting outcomes
Use ball-center coordinates on an illustrative 100×50-inch bed: x=0..8 along the length, y=0..4 across it, origin at the lower-left cushion-nose corner. Equal 2.25-inch balls have radius 0.09 and diameter 0.18 units. Intact-cushion center limits are 0.09..7.91 and 0.09..3.91. Real pockets interrupt the boundary at four corners and (4,0),(4,4). Measure your actual bed, balls and pocket mouths before scaling. Remove measuring aids before shooting and never mark a competition table.
This worked card uses WPA ten-ball. Put the 1 at (6,2), the foot spot with the head end at x=0. Four rows use x=6+r√3×0.09 and y=2+(2j−r)×0.09 for row r=0..3 and j=0..r. Put 10 at row 2, center j=1; distribute the others without a deliberate pattern. The drawing is one possible arrangement, not a placement strategy.
Choose cue center (1.6,2), strictly behind the head string x=2, with an intended straight first contact at (5.82,2). Keep cue, balls, normal chalking, comfortable pace request and cue start fixed. Check tightness before striking; a rejected rack is an input correction, not a break attempt. Never knowingly break a bad rack for the comparison.
Accept and document the rack inputs before using an outcome to change delivery.
Give every field an observable boundary
Take ten struck breaks, recording misses, scratches and interrupted results. Five binary fields produce fifty planned cells. A pass needs evidence; an obscured contact or uncertain rail count stays unknown and is not an automatic point. A known illegal break is a fail for legality even if other observations look good.
| Field | Pass definition | What it does not prove |
|---|---|---|
| First contact | 1 is first contacted and registered view shows cue center within ±0.09 in y of (5.82,2) | Perfect energy transfer |
| Cue rest | Cue center at rest inside x=3..5, y=1.4..2.6, no scratch/off-table | The drawn rectangle is a guaranteed leave |
| Spread | At least six object centers finish more than 0.5 units from apex (6,2), pocketed balls counted as having left | Every next shot is available |
| Legality | Correct first contact, no foul, and a pocketed object or at least four object balls driven to rails | A precontact rail alone satisfies ordinary later-shot rules |
| Access | Write one actual legal next-shot plan to the lowest remaining ball: offensive route or permitted push-out/defensive choice | Runout or a made next ball |
Read the components before combining anything
The spread boundary and central finish box are original diagnostic preferences, not governing requirements. Inspect actual rest centers only after all balls stop. Record pocketed count separately. Access earns a record-presence flag for an identified usable legal plan, not a potting-performance point. Do not add these mixed flags into a universal break ability percentage.
Hypothetical ten-break card: contact 7/9 observable with one unknown; cue rest 6/10; spread 8/10; legality 9/10; access plan documented 5/10. There are 49 observable cells and 35 passes, with one unknown. That is a documentation/outcome summary only. The contact uncertainty and single foul remain explicit.
Choose one retest from supported evidence
Add five retest strikes only if safe, giving fifteen actual breaks when both blocks finish. A lower effort is useful only if it remains a legal, controlled break for the adopted rules. Do not teach a deliberately deficient break to earn a neat notebook. Unknown contact should prompt a better observation before prescribing spin.
| Repeated evidence | Next bounded experiment | Keep fixed |
|---|---|---|
| Contact drifts at the current effort | Five strikes at a lower controllable effort, still meeting legal-break requirements | Start, rack, cue and target |
| Contact repeats but finish leaves the box | Five strikes with one modest delivery change, noting actual input | Rack and intended first contact |
| Spread fails after accepted rack and repeated contact | Check equipment/table condition and one legal input hypothesis | Do not change three things at once |
| No usable next plan despite controlled results | Compare one alternate permitted cue start | Effort and rack acceptance |
Carry the observation into play without rewriting the record
Use the selected input for five separate game breaks and record actual opportunities. These are transfer racks, not extra baseline points; twenty struck breaks occur only if all ten, five and five were completed. A cue-ball hop is not a quality target, and a single lucky pocket does not settle the diagnosis.
This card locates the next supported outcome question. The speed ladder compares effort bands, while the cause-isolation guide checks rack/contact/speed in sequence. Keep those distinct tasks rather than turning every break page into the same checklist.
Compare effort bands after contact is observable for the separate speed decision.
Isolate rack, contact and speed inputs when the source of the problem remains uncertain.
Sources and further reading
References support the specific factual information above. The practical checklists are Ariakon editorial guidance.