
Eight ball strategy · 5 min read
Choose Solids or Stripes From the Whole Eight Ball Layout
The easiest first shot does not necessarily identify the better group. A useful choice compares the complete route from the first legal ball to the eight, including blocked pockets, clusters, transitions and what remains for the opponent. This worksheet makes that comparison visible before one attractive shot decides the rack for you.
Confirm when the group is actually chosen
Under the current WPA eight ball rules, the table remains open after a legal break even when the breaker pockets a ball. On an open table, the called ball that is legally pocketed assigns its group to the shooter; a miss leaves the table open. Other leagues and local rooms can use different group assignment rules, so name the ruleset before applying the worksheet.
This guide begins only when you have a genuine choice. If the rules or a previous legal shot have already assigned groups, use the same table reading steps to plan that group instead of treating the rack as open.
Check common eight ball rule assumptions before using a strategy that depends on group assignment.
Read the eight ball before either group
Identify every realistic pocket for the eight and the final position zone that reaches each pocket. Then find the likely key ball from solids and the likely key ball from stripes. A group with six easy balls but no usable path from its last ball to the eight can be worse than a group with one repairable problem.
Also note whether an opponent ball blocks the eight pocket or helps you as a stopper. Do not remove a useful blocker merely because it is available. The decision is about finishing the rack, not reducing your ball count as quickly as possible.
Score six observable factors
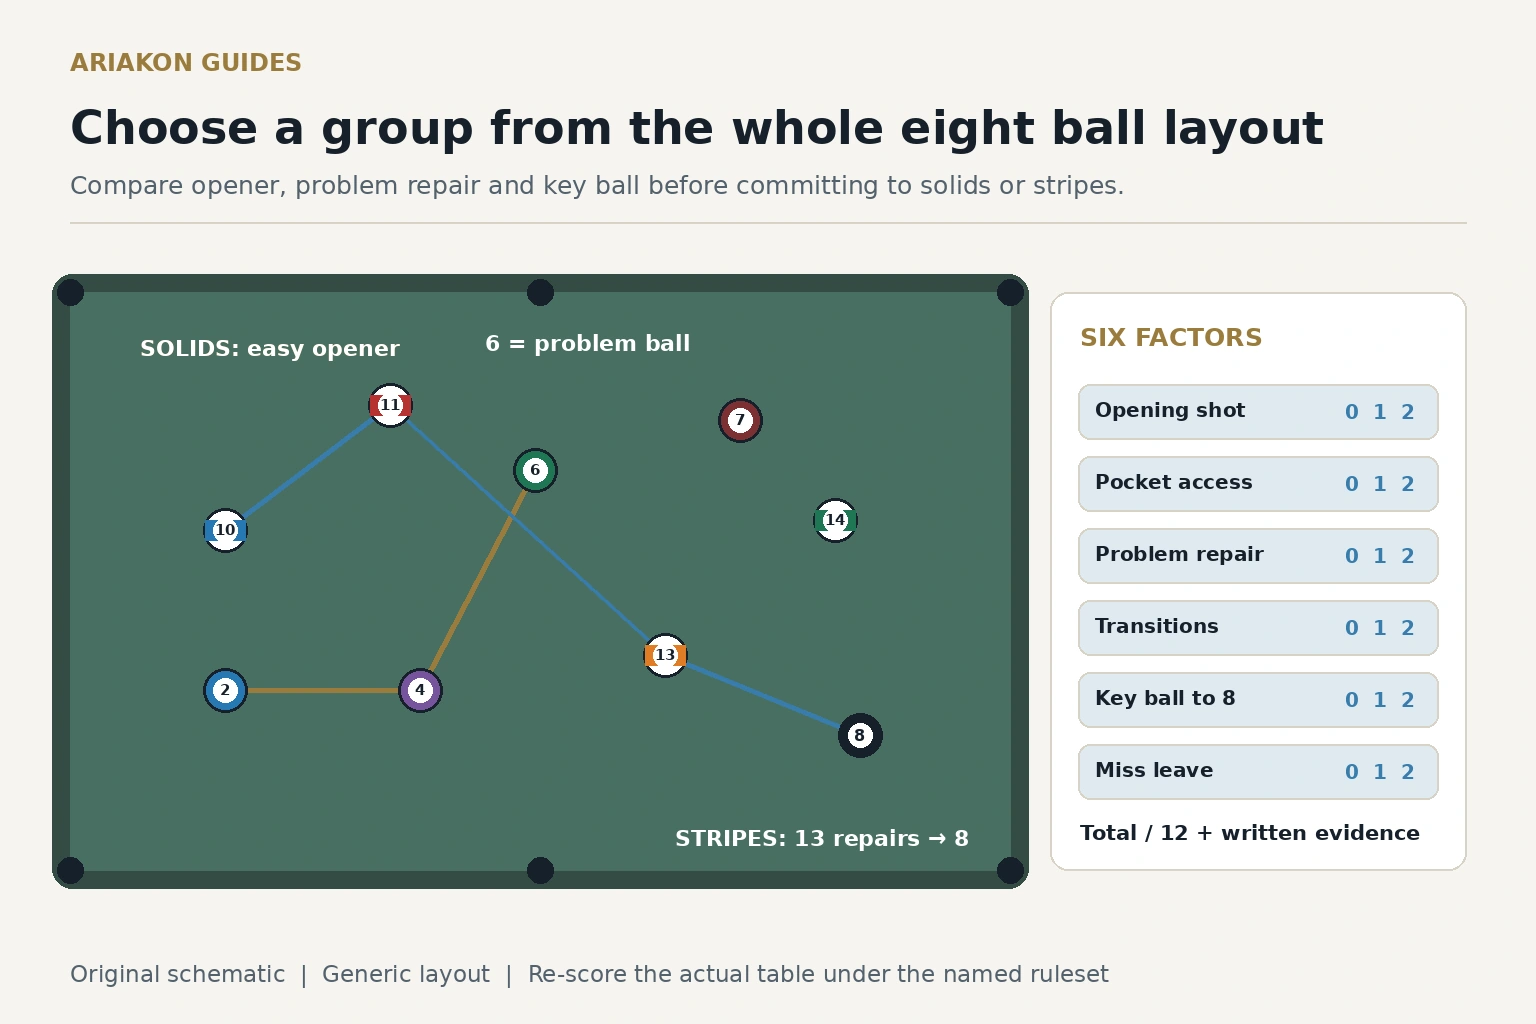
Give each group zero, one or two points in six rows. Two means favorable now, one means workable with a named repair, and zero means blocked or undefined. The twelve point total is a prompt for analysis, not a validated win probability. Write the evidence beside the number.
If the totals are close, prefer the group with a clearer problem ball solution and a safer opening shot. A high score built on one speculative breakout is less useful than a slightly lower score with several controlled routes.
| Factor | Solids 0 to 2 | Stripes 0 to 2 | Evidence to write down |
|---|---|---|---|
| Reliable opening shot | Fill in | Fill in | Ball, pocket and cue ball finish |
| Open pocket access | Fill in | Fill in | Count balls with a clear pocket |
| Problem ball repair | Fill in | Fill in | Cluster, rail or blocked pocket and repair ball |
| Transitions between zones | Fill in | Fill in | Largest cue ball movement required |
| Key ball to the eight | Fill in | Fill in | Named key ball and final position zone |
| Opponent layout after a miss | Fill in | Fill in | What you leave if the first plan fails |
| Total out of 12 | Fill in | Fill in | Use the evidence, not the total alone |
Use a worked choice without pretending it is universal
Suppose solids offer three open balls and an easy first shot, but the 6 ball is tied to a stripe beside the only practical eight ball pocket. Stripes offer two open balls, a tougher but comfortable opener, and the 13 ball can break the cluster while leaving a natural angle on the 11 as the key ball. Solids might score eight and stripes ten because stripes own a named repair and finish route.
That example does not prove stripes are always better when they have fewer open balls. It shows why the problem ball, repair ball and key ball must appear in the same decision. Change any of those facts and score the layout again.
Run a twelve rack decision drill
Use twelve practice layouts that are genuinely open under the agreed rules. After each legal break, photograph the unchanged layout and complete both group columns before the first post-break shot. If a break, foul or event variation does not leave a genuine choice, set that rack aside and record why. For six layouts stop after the first shot; for the other six continue until the inning ends. This is a group-choice comparison, while the beginner worked-rack guide follows an entire rack and its rule changes.
Award one point when both groups have complete evidence, one when the chosen group has a named problem ball solution, one when it has a named key ball to the eight, and one when the first shot preserves the plan. Maximum is four per rack and forty eight for the session. Do not award points merely because a ball fell.
| Rack | Chosen group | Complete comparison | Problem solved | Key ball named | First shot preserved plan | Score out of 4 |
|---|---|---|---|---|---|---|
| 1 to 4 | Fill in | Fill in | Fill in | Fill in | Fill in | Fill in |
| 5 to 8 | Fill in | Fill in | Fill in | Fill in | Fill in | Fill in |
| 9 to 12 | Fill in | Fill in | Fill in | Fill in | Fill in | Fill in |
Review the decision instead of the result
A missed first ball does not automatically make the group choice wrong. Review whether the layout evidence was complete and whether the shot was within your current execution range. Conversely, a successful run does not validate a choice that depended on an unplanned collision.
After the session, count which row most often decided the group and which row you left blank. Make that missing row the focus of the next six racks. Table reading improves when the same question is answered repeatedly, not when every rack produces a new theory.
Build complete eight ball patterns after the worksheet identifies the better group.
Manage clusters before they stop the run when both groups contain a problem ball.
Sources and further reading
References support the specific factual information above. The practical checklists are Ariakon editorial guidance.