
Cue tip construction · 6 min read
Compare Layered and Single Piece Leather Pool Cue Tips
Layered and single piece leather tips are two construction choices for the same job: a secure, maintainable contact surface that holds chalk. Compare the installation, care and feedback you can actually observe. Neither a layer count nor a hardness label settles the choice on its own.
Understand where the bonds are
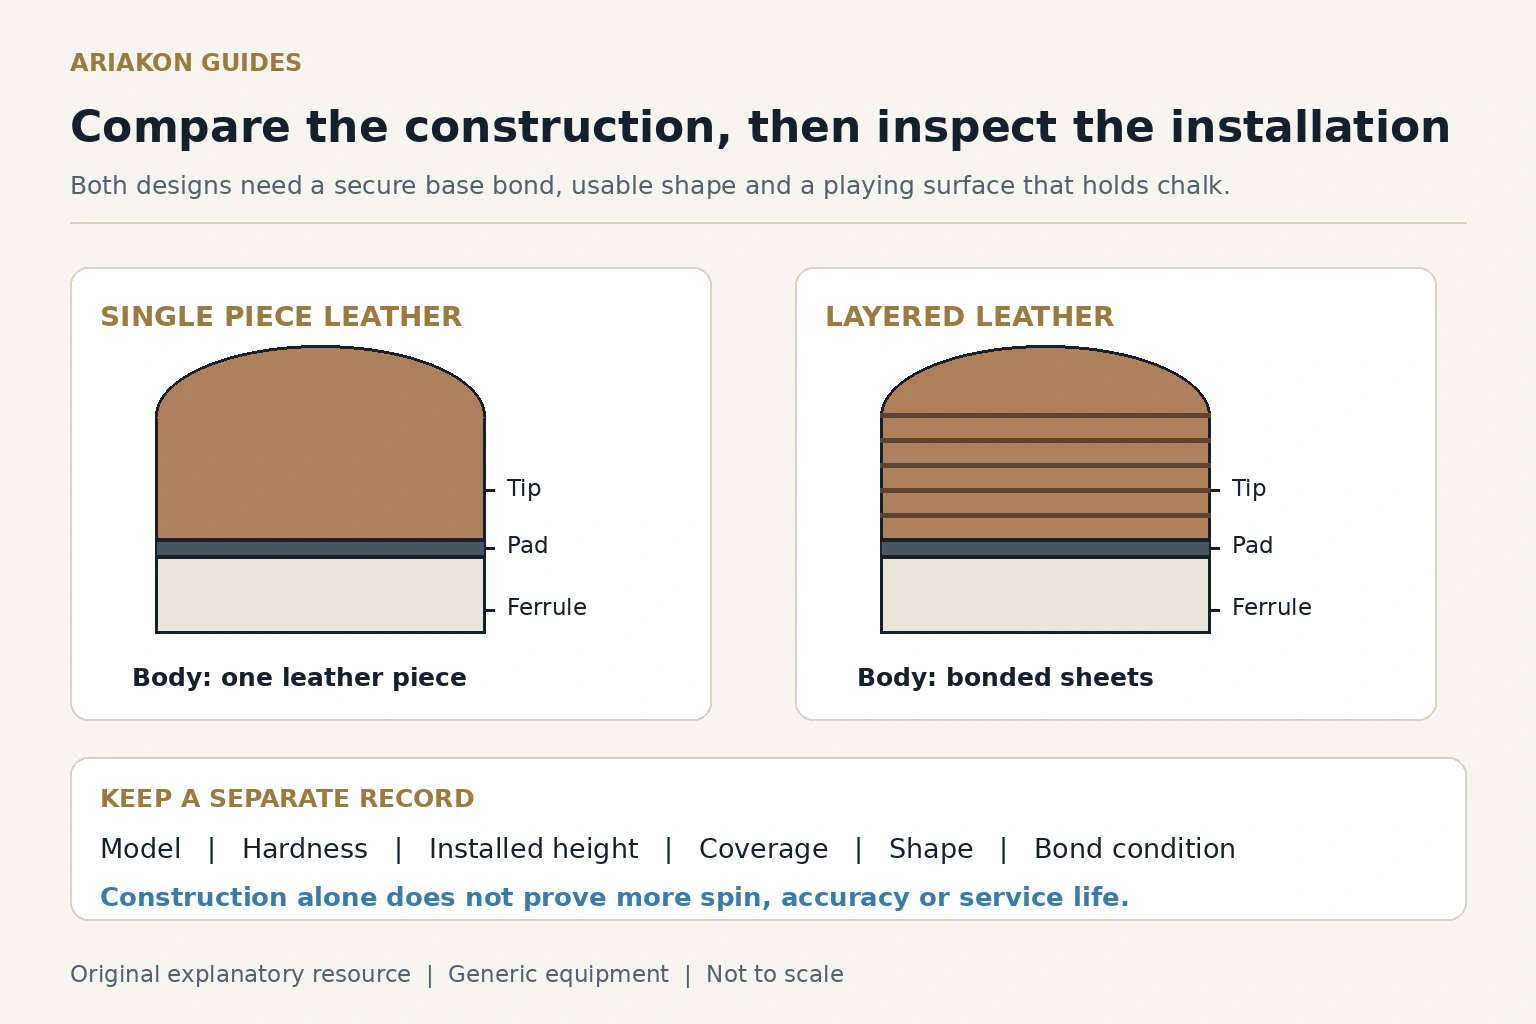
A single piece tip uses one piece of leather through the tip body. It still has an adhesive bond attaching it to the cue's front end. A layered tip bonds thin leather pieces together, adding internal bond lines within the body. A pad beneath either tip belongs to the shaft assembly and should not be mistaken for another tip layer.
Use the schematic to locate the extra internal interfaces, not to count a particular product’s layers. The separate support pad and attachment bond remain different components. Manufacturing process, hardness, treatment and installation quality require their own documented fields; no construction diagram establishes a performance advantage.
Keep construction, hardness and treatment in separate fields
Layered does not mean soft, and single piece does not mean hard. Record the maker, model, nominal hardness and any documented treatment separately. Different brands may use different hardness categories or measurement methods, so medium is not a universal material specification.
A treated or compressed single piece tip remains a separate buying question from ordinary single piece leather. Do not classify it as layered because it has a pad or a dark surface band.
Understand treated milk dud tips if compression or treatment is the construction detail you want to investigate.
Separate hardness from spin claims before using a soft label as a performance promise.
Compare the practical tradeoffs
| Question | Single piece leather | Layered leather |
|---|---|---|
| Internal structure | One leather body; no internal lamination seams. | Bonded leather sheets with internal seams. |
| Installation | Requires a sound base bond and correct shaping. | Requires a sound base bond, correct shaping and intact internal bonds. |
| Inspection | Look for looseness, cracks, shape change and chalk coverage. | Check the same items plus lifting or separation between layers. |
| Consistency | Judge the actual maker, model and samples; construction alone is not proof. | Judge the actual maker, model and samples; layer count alone is not proof. |
| Maintenance | Use restrained, appropriate shaping and surface care. | Use restrained care and avoid catching or lifting layer edges. |
| Buying decision | Compare current installed cost, availability and preferred feedback. | Compare the same factors without assuming a premium price means better play. |
Do not buy a layer count as a spin guarantee
Treat “more spin,” “more accuracy” and “longer life” as separate claims needing a stated test. Layer count describes an internal structure; it does not isolate hardness, installed height, contact offset, chalk coverage or cue-ball speed. Do not infer a spin benefit from a single successful draw shot.
For your decision, ask whether the tip holds coverage, remains secure, keeps a usable shape and gives feedback you can control. A dramatic draw shot with a new tip changes too many variables to establish a construction advantage.
Agree on the installation record
Before installation record the exact tip model, nominal diameter and hardness, shaft model and required pad or plate. Ask the installer to follow both the tip and shaft instructions, preserve required front end components and leave an appropriate usable tip height.
Photograph the finished tip from the side and above. Record the installation date and installed cost, including labor. Do not compare a fully installed price with the price of an uninstalled tip blank. Keep the original packaging or identifying details for the next replacement.
Plan tip replacement safely to protect the shaft and front end assembly.
Use a care log that catches the meaningful differences
At installation and after each of your first five sessions, record approximate playing time, visible dome shape, sidewall overhang, surface glazing, coverage problems, looseness and any layer separation. Photograph under similar light. Leave expected lifetime blank until you have observed actual use.
Mushrooming means the sidewall extends beyond the intended edge of the front end. It is a condition to assess, not automatic proof that one construction is defective. A lifting layer or an opening at the base requires prompt installer advice; do not continue hard shots or inject household glue.
| Session and date | Playing time | Coverage and corrections | Shape or edge change | Bond or layer concerns | Next action |
|---|---|---|---|---|---|
| Installation | Fill in | Baseline photo | Baseline photo | Installer inspection | Record model and cost |
| Session 1 to 5; copy a row each time | Fill in | Fill in | Fill in | Fill in | Care, monitor or service |
Compare twenty attempts without claiming a construction winner
Use a measured 100 × 50-inch playing surface with 2.25-inch balls. Coordinates use x=0–8 along the length and y=0–4 across the width; one unit is 12.5 inches. Use real corner pocket P=(8,4), object-ball center O=(6,2) and cue-ball center C=(5,1). The straight contact-center position is G=(5.8727,1.8727): O minus the 0.18-unit ball diameter along the 45-degree line. Keep this exact layout for every attempt and photograph the centers.
Shoot five stop attempts, five modest follow attempts, five modest draw attempts and five small familiar sidespin attempts. Record each contact offset before its block and keep it unchanged. Use the same table, balls, chalk and ordinary speeds. The sidespin block observes potting, miscues and finish only; it does not prescribe a rail route or demand maximum spin.
- A pot earns 1 only when the called object ball falls without a cue-ball scratch. A target point also requires that pot and a resting cue-ball center inside or on the target boundary.
- Maximum: 35 points from 20 attempts. Count miscues separately; a scratch earns zero on that attempt. Keep pot and target subtotals visible.
- Repeat on another day and save the installation/care log. If hardness, height, shaft or conditions differ, label the comparison confounded rather than attributing a result to layer construction.
| Block | Target for cue-ball center | Maximum points |
|---|---|---|
| Stop — 5 | Circle radius 0.125 unit centered at G | 5 pot points + 5 target points = 10 |
| Follow — 5 | Circle radius 0.25 unit centered at (6.5,2.5) | 5 pot points + 5 target points = 10 |
| Draw — 5 | Circle radius 0.25 unit centered at (5.5,1.5) | 5 pot points + 5 target points = 10 |
| Sidespin — 5 | No finish target; record direction, offset and final center | 5 pot points; no route points |
Choose from a real preference and service record
If both constructions support your ordinary shots, decide from feedback, actual care effort, installed cost and reliable availability. If your current tip works well, keep its model and installation record rather than changing simply to add or remove layers.
If you see early separation, ask the installer to identify whether the base bond or an internal layer is failing. Those require different diagnoses. One failure should be recorded honestly for that sample; it is not proof that all tips of that construction fail.
For example, 4 stop pots with 3 target hits, 4 follow pots with 2 targets, 3 draw pots with 2 targets and 4 sidespin pots total 7+6+5+4=22/35. This is a hypothetical calculation, not a tested tip result. An opening at any bond overrides the record and ends the trial.
Use safe tip tools when maintenance is appropriate.
Return to complete tip selection to combine construction with the cue purpose and your care preferences.
Sources and further reading
References support the specific factual information above. The practical checklists are Ariakon editorial guidance.