
Equipment procedure · 5 min read
How to Chalk a Pool Cue Tip Without Grinding the Center
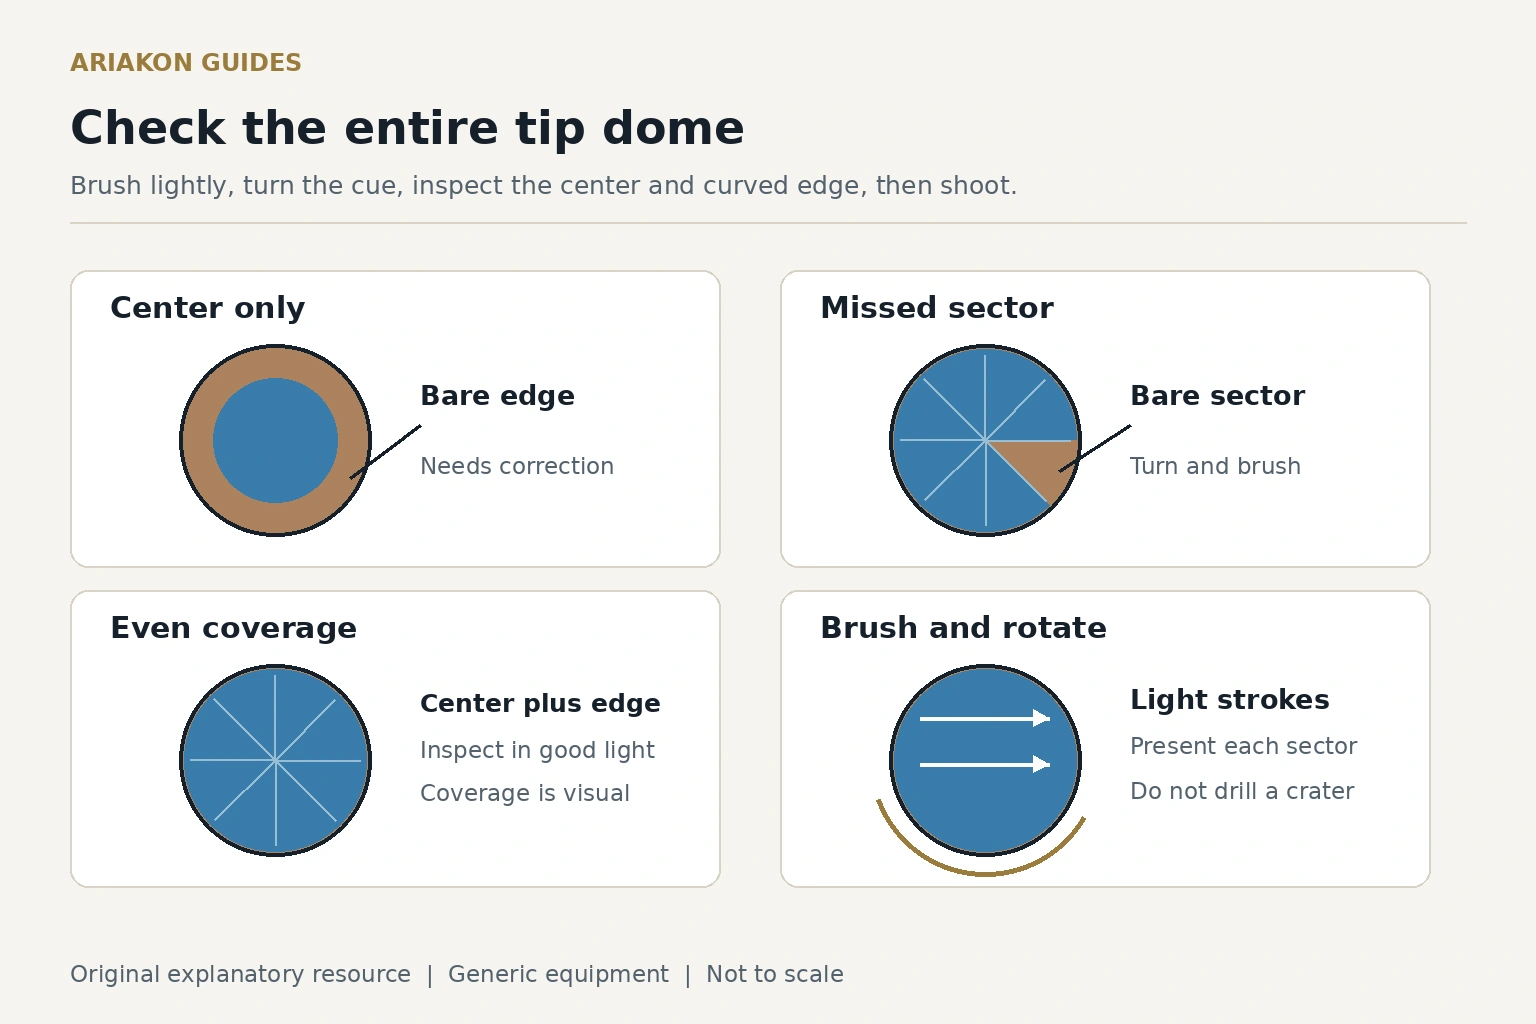
A dark center can hide a bare shoulder on a rounded tip. This guide teaches the hand motion and visual correction that prepare the actual playing surface: present a usable chalk face, sweep lightly, turn the tip into view and correct a missed patch. Its eight-sector worksheet is an original observation aid, not a friction measurement or a branded chalking system.
Clear the starting surface and the work area
Work upright, with the tip safely supported and the chalk away from cloth, drinks and other people. Under a steady light, look for a loose tip, lifting layer, chipped edge or opening at the bond. Do not push the tip sideways to test the glue. Any visible movement or structural damage stops the procedure and goes to qualified service.
Identify the actual tip material and its permitted care before using a tool. Chalking is not scuffing, shaping or cleaning contamination. If a sound surface will not accept a light application, record the condition and consult its specific instructions rather than escalating pressure or adding an unknown liquid.
Use the tip condition checklist when the starting surface or attachment needs attention.
Present the dome to a moving chalk face
Change the angle between the chalk face and the rounded tip as needed to reach the shoulder. The useful contact ends at the playing dome: chalk on the vertical sidewall or ferrule is not extra preparation. A deep cavity in the cube may leave the outer dome untouched even when the center looks covered.
The illustration is a face projection, not a flattened tip. Tilt the cue to see the curved shoulder; rotate it to inspect an area hidden by your hand. It is normal to make a small correction before the shot. A loose mound or darker shade is not evidence of a stronger coating.
| Action | What to look for | Stop or correct |
|---|---|---|
| Present | A usable chalk face reaches the tip without a wrapper or holder obstruction | Use another accessible area; do not force a holder opening |
| Sweep | Short, light movement across the playing surface | Do not bore the tip into a fixed crater |
| Turn | The next portion of the curved surface faces the chalk | Turn to present a sector, not to grind a hole |
| Inspect | The center and curved shoulder are visible under the same light | Correct a missed patch with a local light sweep |
| Put down | The cube returns to its designated holder or surface | Keep the chalk face off the table cloth |
Inspect nine zones without turning color into a test result
Divide the face mentally into eight equal sectors around a separate central patch. Inspect the center, then the eight sectors in a fixed clockwise order. Each sector check includes its visible shoulder, not only the flat-looking central projection. A coverage pass needs all nine zones visibly covered; do not average away one bare edge.
Record three things separately: pass after correction; which zone needed correction; and unwanted chalk on the ferrule or fingers. Color is a visual cue, not coating thickness, friction, contact tolerance or guaranteed miscue protection. If coverage is difficult to see, improve lighting instead of rubbing harder.
| Pattern | Check first | Bounded action |
|---|---|---|
| Blue center, bare outer ring | Contact angle reaches only the center | Present the curved shoulder and sweep locally |
| One bare sector | Hand angle or wrapper blocks that sector | Reposition as intended; expose a usable chalk face |
| Patch remains smooth or dirty | Tip condition is unresolved | Stop forcing coverage and use the correct care/service route |
Practice five applications, then ten exact straight shots
First make five off-table applications, inspecting all nine zones each time. Log coverage, corrections and ferrule cleanliness. These are five preparation opportunities, not five shots or five product tests. Do not remove sound tip material between applications merely to restart the exercise.
For the table part, use a 100×50-inch playing surface and 2.25-inch balls. Coordinates are ball centers in units of 12.5 inches, with (0,0) at one corner cushion intersection, x along the long side and y across the bed. Put object O=(6,2), cue C=(5,1), and aim O at the real far corner pocket P=(8,4). The full-contact cue center is G=(6−0.18/√2,2−0.18/√2)≈(5.87272,1.87272). C, G, O and P are collinear; no cushion contact is prescribed.
Use familiar controlled speed and no side spin, resetting the same centers for ten attempts. Before each, prepare and inspect the tip while upright. If you prefer a stop shot, choose a small below-center contact that arrives without forward roll; the drill awards no position points. Use only a venue-approved removable layout method during practice, remove it before matches, and never use chalk as an aiming marker.
Score preparation separately from the shot outcome
Maximum: 30 process points from ten shots. Add the five off-table applications to get fifteen preparation opportunities and 135 zone checks, not fifteen scored shots. Record pots out of ten and miscues out of ten in separate columns; neither replaces a missing preparation point.
Hypothetical record: coverage 9/10, neatness 9/10 and timing 8/10 give 26/30. Two timing failures need a standing-routine cue; the one failed coverage check needs an angle correction. Even ten pots would not change 26/30. A miscue prompts inspection and delivery review; it does not prove a chalk formulation failed.
| Point | One point requires | Keep separate |
|---|---|---|
| Coverage | All nine zones pass before the stroke, including any correction | Number and location of corrections |
| Neatness | No unwanted chalk on the ferrule after preparation | Loose residue and cleanup observations |
| Timing | Inspection and application finish before entering final stance | Pot, miscue and any interrupted attempt |
Move from application skill to a repeatable habit
The next session should reproduce the same light-motion and nine-zone check without rushing. Keep the actual product, tip condition and light recorded so an unexplained difference stays visible. Do not infer a universal number of shots between applications from this short exercise.
This page teaches coverage technique. A habit audit asks when the step happens during play; a chalk comparison asks how samples behave under matched conditions; a replacement-lot check asks whether a received item belongs in the kit. Keep those questions separate.
Audit the pre-shot habit after the hand motion is comfortable.
Compare chalk under matched conditions without changing the application method between samples.
Check a received replacement lot before adopting it for matches.
Sources and further reading
References support the specific factual information above. The practical checklists are Ariakon editorial guidance.