
Measured break practice · 6 min read
Find Your Best Break Cue Weight With a Controlled Test
Your best break cue weight is a setting you can deliver accurately and repeat comfortably. This controlled comparison helps you test three settings without letting one spectacular break, a changing rack or late session fatigue decide the answer.
Define the decision before changing hardware
Cue mass, delivered speed, contact and complete-cue balance can all change the break result. Decide whether the task is cleaner contact, better cue-ball control or a safely repeatable speed, then keep those observations separate. This test selects a setting for one cue and player; it supplies no universal ideal weight.
Use one adjustable cue when possible. Follow its approved weight system and secure every part before shooting. Changing a butt weight can also change balance, so describe the conclusion as the best setting of this cue. Comparing three different cues compares complete cues, including their tips, shafts and balance.
Choose the right type of break cue before testing small configuration changes.
Prepare three settings and one repeatable rack
Choose A as your familiar setting and B and C as two supported alternatives. Record actual assembled weight if you can measure it, the installed hardware and the balance point. Do not infer assembled weight from the bolt label alone.
Use the same table, balls, rack type, game, racking method, cue ball position and intended contact point. Photograph the cue ball placement relative to the diamonds. Rerack with the same care each time; visibly poor racks should be repaired before the shot rather than blamed on a setting afterward.
Choose an ordinary controlled effort you can repeat. Do not begin at maximum effort. If a reliable speed measurement is available, keep the device and measurement method fixed and record each reading. Without it, record perceived effort and leave speed unmeasured; neither a loud hit nor a wide spread supplies an accurate speed reading.
Set a visible cue ball finish target
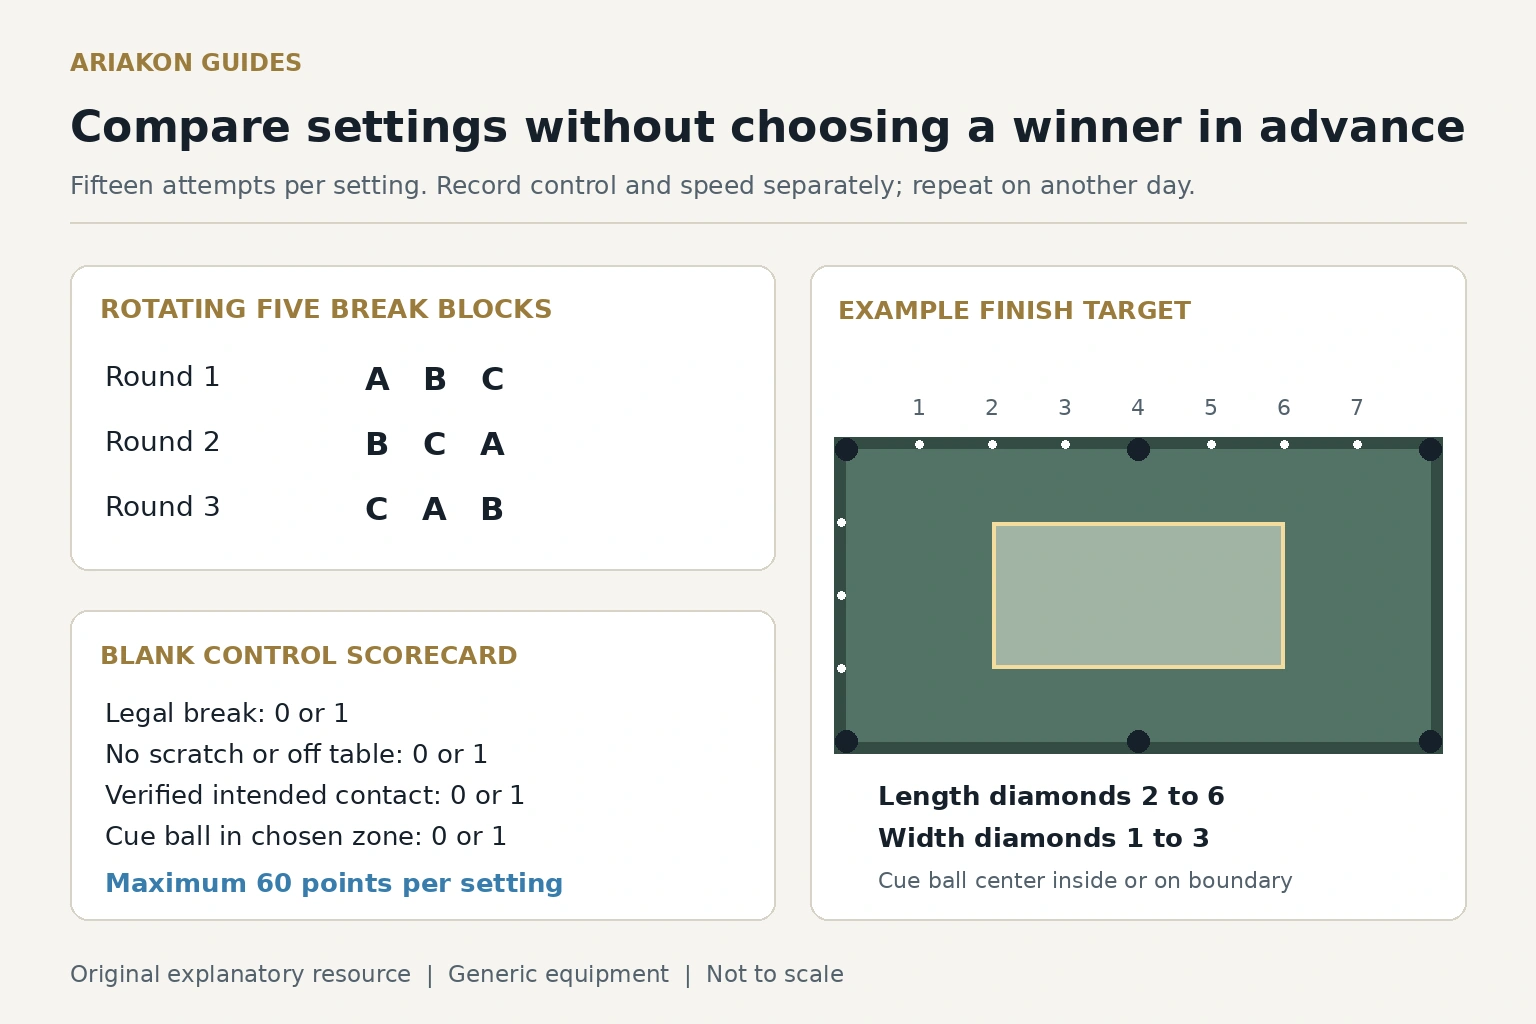
For a first central break comparison, use the middle half of the table length and the middle half of its width as the finish zone. On an eight diamond length and four diamond width reference, its boundaries run from length diamond 2 to 6 and width diamond 1 to 3. The cue ball center must finish inside or on this rectangle to count.
The diagram locates the rectangle. Do not leave markers on the cloth while breaking. If your tested break route has a different sensible finish target, define it before the first scored shot and use the same target for all settings. This zone is an editorial practice target, not a rule or a promise of good position.
Rotate short blocks to reduce order bias
After warming up, record five breaks with A, five with B and five with C. Take a short rest, then use B, C, A. Finish with C, A, B. Each setting receives fifteen scored attempts, and each appears once early, once in the middle and once late.
Keep the same rest opportunity after every block. Do not delete scratches or bad contact from the record. A measurement failure is recorded as missing data, not a successful shot. A rerack problem identified only after the break belongs in the notes; do not quietly remove an unfavorable result.
Use this per break log
Copy this row for each attempt: session and date; setting; block and attempt; rack check before shot; intended effort; measured speed or unmeasured; legal under the chosen rules; scratch or ball off table; intended lead ball contact achieved; cue ball in target; pocketed balls; unusual event; comfort.
Judge contact from a consistent video view if practical. If you cannot confidently distinguish a full intended hit from a glancing hit, mark contact unknown. Check the actual rules of the game or event for legal break requirements. Pocket count alone does not establish a legal or effective break.
| Setting and measured weight | Legal out of 15 | Scratches or off table | Intended contact out of 15 | Target finish out of 15 | Median measured speed or blank |
|---|---|---|---|---|---|
| A: fill in | Fill in | Fill in | Fill in; note unknowns | Fill in | Fill in only if measured |
| B: fill in | Fill in | Fill in | Fill in; note unknowns | Fill in | Fill in only if measured |
| C: fill in | Fill in | Fill in | Fill in; note unknowns | Fill in | Fill in only if measured |
Score control before rewarding speed
For each attempt give one point for a legal break, one for no scratch or off table event, one for verified intended contact and one for the cue ball finishing in the target. Unknown contact receives no contact point and remains labelled unknown. Maximum control score is sixty per setting.
First compare scratches and failed legal breaks. Then compare contact, target finishes and total control score. Use measured median speed only to separate settings with similar control. This is a practice score designed for the comparison, not a validated performance index. Do not let a faster but repeatedly scratched setting win merely on its average speed.
Work through the calculation without inventing results
When your log is filled in, let L be legal attempts, N attempts without a scratch or off table event, H verified intended hits, and Z target finishes. Your control score is L plus N plus H plus Z. Each number uses the same fifteen attempts. Keep the actual counts alongside the sum so two very different patterns cannot look identical.
For example, a setting that scores well on legal breaks but misses the target calls for a cue ball route or contact review. A setting with unreliable contact at the same effort calls for a slower baseline. These are decision examples, not reported test findings.
Repeat before settling on a weight
Repeat the complete forty five break comparison on another day. Reverse the first block order so the original favorite does not always receive your freshest delivery. Look for a repeatable direction in contact and control, not a one point victory from a small sample.
If the settings are effectively tied for your task, choose the comfortable supported setting and stop adjusting. If speed is the main goal, conduct a separate follow up with the two controllable settings at a slightly higher effort. Never change weight, break position and target contact in the same comparison.
Build a faster controlled break after you have established a reliable configuration.
Calibrate break position in a separate session so it does not confound this weight test.
Verify specifications before buying an adjustable cue
The Ariakon Apocolyte page checked October 10, 2026 lists a default twenty ounce configuration and adjustment from seventeen to twenty two ounces with an optional weight kit. Confirm the current configuration and compatible kit on that product page before ordering. The listed range supplies possible settings, not evidence of an ideal weight.
View the Apocolyte specifications to check the documented configuration and optional adjustment system.
Sources and further reading
References support the specific factual information above. The practical checklists are Ariakon editorial guidance.